
Graphics2D
Required Reading
Java Tutorial on Java2D. Omit the Printing Lesson.
Didn't we just cover Graphics?
Yes, we did, but we covered the "early" version of graphics. There are times when you want to use these graphics methods, but if you noticed, they are all pixel based - you are drawing shapes by specifying which pixels are shaded.
When Sun upgraded Java to Java 2 (aka JDK 1.2+), they wanted to make some serious improvements to their low level graphics capabilities. Just as the Collections API was an upgrade to the initial data containers of JDK 1.1, the Java2D api is an upgrade to the AWT graphics packages.
The Java2D API provides the following:
To do this, they redesigned how graphics were sent to the screen. The idea was to have a uniform rendering pipeline that applied transformations and rasterization to all graphics operations.
Java2D Rendering Pipeline |
 |
You may or may not have noticed that you really don't have a lot of options in AWT Graphics, all lines are one pixel wide, and you can't do a lot with modifying shapes or drawing graphics. The Java2D API enables you to control line thickness, fills, transformations and composites of all drawing operations.
Unlike AWT, Java2D objects live in User Space, defined by Cartesian coordinates. These shapes are eventually mapped to pixels during the rasterization process. Inside the rendering pipeline, the rasterizer takes these ideal shapes within your program and produces coverage values for each pixel on a display device. The coverage values represent how much of each pixel is covered by the shape.
Drawing Shapes in Java2D
Except for Point2D and Dimension2D, each of the geometry classes used to draw shapes in Java2D implements the Shape interface. With these classes, you no longer call drawXXXX methods, instead, you make the Shape object, and then pass it to a draw() or fill() method.
To maintain AWT compatibility, they just subclassed the Graphics object. This new object Graphics2D, is what is used as the Graphics object throughout the VM. To use Java2D, the first thing you need to do is cast the graphics object to be Graphics2D
public void paintComponent(Graphics g) {
Graphics2D g2d = (Graphics2D)g;
super.paintComponent(g);
...
}
Ah, you noticed I slipped another line of code in on you after the Graphics2D cast. This super.paintComponent(g) basically cleans up the graphics environment before you start painting. If you don't use it, you can get some stray errors, so always use it.
Finally you need to create some shapes to draw. One of the first things you notice is that if you want to make something as simple as a square, you can't just make a new Rectangle2D object. That is because Java2D supports floats and doubles as descriptors for Shapes. Rectangle2D is an abstract class, but it has two "inner" classes that allow you to define a Rectangle2D as a float (Rectangle2D.Float) and as a double (Rectangle2D.Double). There is no "right" answer as to which one to use, you typically use the one that fits your data best.
The table below summarizes some of the basic Shapes (and points) that you will use when drawing with Java2D.
class |
Function |
| Point2D | Defines a point (not a pixel!) in the coordinate system |
| Line2D, CubicCurve2D, QuadCurve2D | Define straight and curved lines |
| Shape | Interface used by the classes below. |
| GeneralPath | Allows you to build polygons (both connected and disconnected) |
| Rectangle2D | Defines rectangles and squares |
| RoundRectangle2D | Define rectangles with rounded edges |
| Ellipse2D | Use a rectangle to define an ellipse/circle |
| Arc2D | Draws arc, pies, chords |
If you look in the API, you'll see that these classes all have varied constructors using different types of coordinates. In addition, many of the classes have some excellent utility methods to allow you to perform hit-testing, etc...
Once you have a shape, you have to decide whether to draw of fill the shape. Drawing a shape uses a line style to draw the outline of the shape. Filling a shape, colors in the interior of the shape.
Java2D has a BasicStroke object which allows you to define complex line styles. The BasicStroke object has multiple constructors that allow you to define line thickness, dash patterns, join styles, and cap styles.
Let's take a look at the code below
public class SimpleStroke extends JPanel {
final static float dash1[] = {10.0f, 5.0f, 10.0f, 2.0f};
final static BasicStroke dashed = new BasicStroke(1.0f,
BasicStroke.CAP_BUTT,
BasicStroke.JOIN_MITER,
10.0f, dash1, 0.0f);
private Rectangle2D.Double square =
new Rectangle2D.Double(10, 10, 100, 100);
public SimpleStroke() {
super();
setLayout(null);
}
public void paintComponent(Graphics g) {
super.paintComponent(g);
Graphics2D g2d = (Graphics2D)g;
g2d.setStroke(dashed);
g2d.draw(square);
}
...
In the above code, we can see several pieces of code we've just talked about. First, note that we make a BasicStroke object called "dashed". This is a one pixel wide line, with a CAP_BUTT and JOIN_MITER option, and a dash array of 10 pixels on and 10 pixels off with a phase offset of 0. (see the API for what these mean).
Next we make a Square. Its right-top corner is at 10 pixels down and to the right of the top-left edge of the frame. It is 100 pixels wide and 100 pixels high.
In the SimpleStroke() constructor, note the setLayout(null). You should use this whenever you are only using a JPanel for Java2D/AWT graphics.
Finally, the paintComponent() method. We have the super.paintComponent() and Graphics2D lines. After that we start manipulating the Graphics2D object.
When drawing to Graphics2D, it is easiest to imagine you are setting the options for a pen, then telling the pen to draw a shape. In this case, we want to set the line style to "dashed" and then draw the "square". You could also change color by using g2d.setPaint() and font by g2d.setFont().
When we run this object (you'll need to add a "main" method), the following window appears:
Drawing a Simple Shape |
 |
Filling Shapes
The next step is to be able to "fill" a shape. We can fill a shape with a solid color (easiest), a gradient color (easy), and a tiled image (still pretty easy).
As I mentioned above, you can change a color by using setPaint(). For a solid color, you just pass the color to setPaint(). You may notice that there is still a setColor() method, but you should use setPaint() because it supersedes the setColor() method left over from AWT.
g2d.setPaint(Color.RED);
To use a gradient paint, you first need to make a GradientPaint object. GradientPaints are either cyclic or acyclic linear patterns between two colors. The best way to think of a GradientPaint object is that you are setting a pattern on a colored sheet of paper, and when you draw objects you are "cutting" holes in a top sheet of paper to see the pattern below. If you draw two circles with the same GradientPaint, you'll see that the pattern doesn't start anew for each circle, instead it is a function of the absolute coordinate system.
Download the Netbeans project awtgraphics_1. If you run this file, you will see the following window appear.
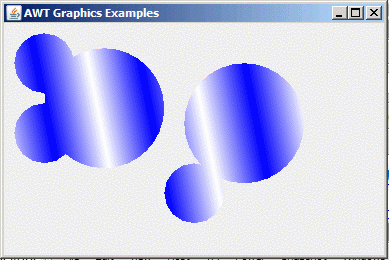
This window was made by "filling" several circles with a single GradientPaint. Notice that you see the same continuous pattern "through" the circles.
The last option is to fill a shape with an image. If already mentioned the getClass().getResource() way of loading a file. To draw with an image you need a BufferedImage and a Rectangle2D. I've already shown how to load in a gif to a BufferedImage using the ImageIO.read() method. The Rectangle2D object is used to scale the image in the BufferedImage object. It effectively makes a "rubber stamp" of the image that is then used to paint the image.
Download the Netbeans project awtgraphics-2. Note the sections of code below
Code to fill with an image |
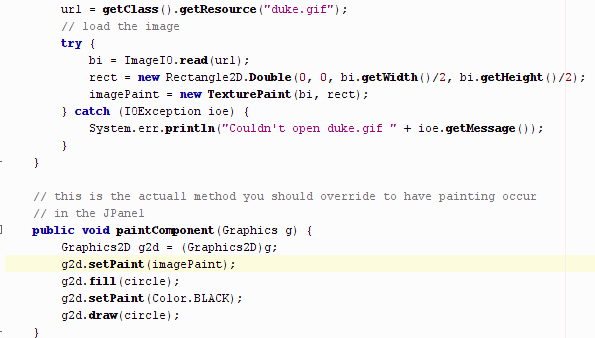 |
The first thing we do is once again load in the "duke.gif" image into the BufferedImage (bi). The next step is to make the Rectangle2D that is used to scale the image. In this case it is half the original size. Lastly, the BufferedImage and Rectangle2D are used to create a TexturePaint object.
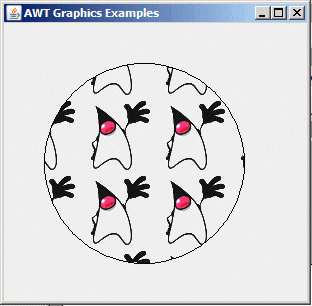
In the paintComponent(Graphics g) method, all that needs to be done is to setPaint() with the TexturePaint image, and then fill a Shape. The resulting image looks like this:
Fonts
So far we've talked about lines, images and graphics, but what about text? We still use the drawString() method to draw the text to the screen, but how do we select the Font to use?
It turns out there are several ways to use Fonts in Java, just as there are actually three types of Fonts in Java.
According to the JDK documentation:
There are two types of pre-existing fonts -- physical fonts and logical fonts. Physical fonts are the actual font libraries consisting of, for example, TrueType or PostScript Type 1 fonts. The physical fonts may be Time, Helvetica, Courier, or any number of other fonts, including international fonts.
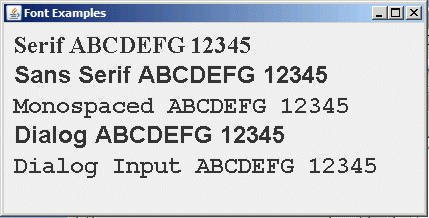
Logical fonts are the five font types that have been recognized by the Java platform since version 1.0: Serif, Sans-serif, Monospaced, Dialog, and DialogInput. These logical fonts are not actual font libraries that are installed anywhere on your system. They are merely font-type names recognized by the Java runtime which must be mapped to some physical font that is installed on your system. In addition to the five logical font types, the Java runtime recognizes four logical font styles: plain, bold, italic, and bolditalic.
The last type of font is a Dynamic font. This font is actually built from a TrueType font file during runtime.
Under normal circumstances, it is best to use the logical fonts defined in Java. Sun has already mapped some of the most legible system fonts to these font names. The figure below demonstrates the set of Logical Fonts on Windows XP, Java SE 6. You can download the Netbeans project java2dfonts and run it yourself.
Using Physical Font Names
If you really feel you need to access Physical (or Local) Fonts, there is a few steps you need to go through.
Lets say you have a local font on your system called “Alladin”
Dynamic Fonts
The newer method Font.createFont(int, InputStream) provides the ability to add fonts to the Java 2 Virtual Machine (JVM) at runtime. This font is not persistent upon termination of the JVM and is only available to the creator of the Font.
At this time, only TrueTypeTM fonts can be created at runtime. The following code sample illustrates how to dynamically load the TrueType font Arial from a file:
File file = new File("Arial.ttf");
FileInputStream fis = new FileInputStream(file);
Font font = Font.createFont(Font.TRUETYPE_FONT, fis);
The following shows the output of a free True Type font downloaded from www.webpagepublicity.com. You can open and download the Netbeans project java2ddynamicfont to look at the complete code.
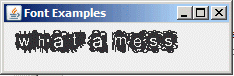
Clearly, the font used here does not exist in the JDK, and it is not loaded on your Windows system. (Note, this free font only supports lower case text).
It is worth looking at the guts of this program:
Dynamic Font Code |
 |
The first line of interest is the following:
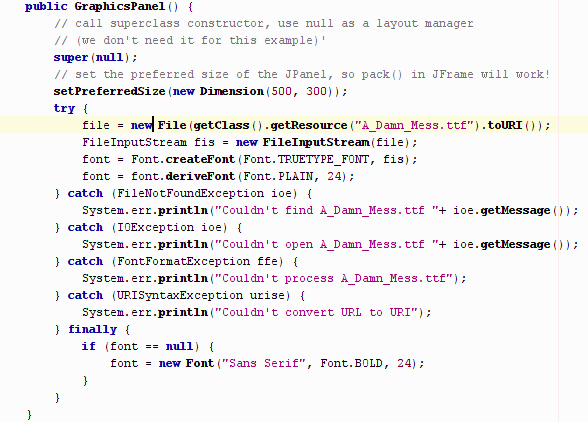
file = new File(getClass().getResource("A_Damn_Mess.ttf").toURI());
We've seen the getClass().getResource() pattern several times, but what about the other code. Well, it turns out that getClass().getResource() returns a URL object. File objects do not have a constructor that uses URL. If you try to call getPath() from the URL, it might work. It will only work if there are no spaces in your path, but if you are on a Windows box, you will often have spaces in your filename.
Instead, there is a toURI() method on URL, and File has a constructor using a URI. If you use this, it will work all of the time.
So, once we get the file, and assign a FileInputStream, we can create the Font. The initial font is only 1 pt. high, so you need to derive a larger font from it, thus the line:
font.deriveFont(Font.PLAIN, 24);
Information on Fonts
When using Fonts, you often want to know information on how wide some text is our how tall it is. With only a few lines of code, you can get the "bounds" of a String. The process involves first getting a FontRenderContext object. This object holds information on how the Font is actually rendered to the screen. Next you define a String and a Font to use, and then finally you can get the bounds (dimension) of the string.
The following code snippet demonstrates how to get this information:
fontRenderContext = new FontRenderContext(new AffineTransform(),
true, false);
String title = “Hello World”;
titleFont = new Font("Sans Serif", Font.PLAIN, 24);
titleFontBounds = titleFont.getStringBounds(title, fontRenderContext);
Graphics Quality
If you look at the rendering pipeline at the top of this page, you'll see that the rasterizer uses something called rendering hints. Rendering hints determine whether graphics are aliased or anti-aliased. This is basically a tradeoff between speed of rendering and quality of rendering.
The default rendering hints are aliased. Aliased rendering is actually preferred for text in the default sizes. Anti-aliasing is good for very large text and graphics objects (Shapes) drawn on the screen.
To turn on anti-aliasing, you need to:
RenderingHints renderHints = new RenderingHints(RenderingHints.KEY_ANTIALIASING,
RenderingHints.VALUE_ANTIALIAS_ON);
...
public void paintComponent(Graphics g) {
super.paintComponent(g);
Graphics2D g2d = (Graphics2D)g;
g2d.setRenderingHints(renderHints);
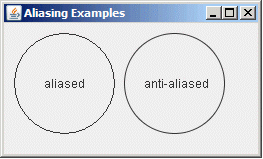
Download and open the Netbeans project java2daliasing. In this project, I draw out two circles to the screen, one is aliased the other is anti-aliased
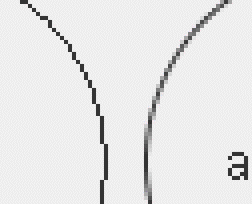
Below is an enlargement of a portion of the above window that clearly shows the aliasing/anti-aliasing behavior. Note that the text is still aliased.
Enlargement of the above example |
 |
Affine Transforms
The last area I'd like to talk about is AffineTransformations. Affine Transforms manipulate graphics so that parallel lines are still parallel after the transformation. AffineTransforms are powerful, but somewhat complex to use. None of our homeworks will require AffineTransforms, but they are good to know.
Graphics2D has an internal transformation that it applies to any graphics device. You can modify or set this transform with:
public setTransform(AffineTransform at)
public transform(AffineTransform at)
You have two options when transforming things, you can transform the entire coordinate system thus affecting anything written to the screen, or you can transform just a single shape.
AffineTransforms let you perform:
Typically, you can get an AffineTransform using static methods on the class. For example, to get a scaling transformation, you would use.
AffineTransform myScale = AffineTransform.createScaleTransform(2.0, 1.0);
I've included a Netbeans project (java2daffine) that you can download and open. This is for informational purposes and some sample code if you want to dig around on your own.

Notice you can make shadows, make your own customized fonts, shift and distort shapes, all with AffineTransforms. The images on the left are Aliased, the images on the right are Anti-Aliased.
Transparency
Remember in Anti-Aliasing how some pixels weren't colored fully? This is an example of "alpha" values for painting to a pixel. It means that the pixel is fully shaded in. Java2D permits you to assign transparency values (alpha values) to any drawing operation.
You can create an AlphaComposite object which is then used to pass the transparency information to the Compositing Rule of the rendering pipeline shown at the start of this page.
Once you have an AlphaComposite value, you can use the setComposite() method on the Graphics2D object to change the alpha value for graphics draws. So to make some transparent text:
AlphaComposite alpha = AlphaComposite.getInstance(AlphaComposite.SRC_OVER, 0.3f);
Would make an alpha value that shows only 30% of whatever is drawn to the screen. Once we have an alpha value we call setComposite():
g2d.setComposite(alpha);
You can download and open the Netbeans project java2dtransparency. If you run this, it will generate the following:
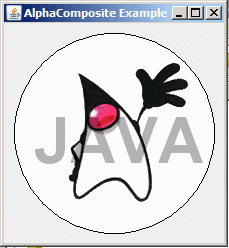
The text "JAVA" is transparent, and is drawn last. This example combines several of the topics we've covered as it draws/fills a shape, draws an image, and then draws the transparent text.
Printing
The last topic that I will briefly mention in Graphics is printing. I'm only going to mention it because doing low level printing requires good familiarity with Java2D.
As you remember, the rendering pipeline doesn't care about it's output device. This means that just as you print to a screen using paintComponent(Graphics g), you print to a printer using printComponent(Graphics g).